前回の続きです。
今まで作成したものだとSpringBootがデフォルトで用意したログイン画面が表示されてしまっています。
動作確認が目的ならこれで充分ですが、世に公開するWebアプリならばやっぱり自分で作った独自のログイン画面を使うのが自然ですよね。
と言うことで今回は独自に作成したログイン画面を使うための設定をやっていきます。
ログイン画面の作成
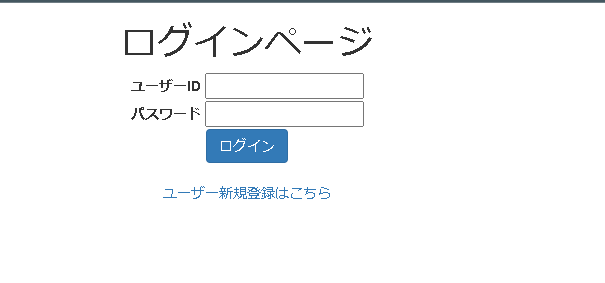
まずは適当にログイン画面を作ります。
6行目、headのところで
/css/common/common.css
のCSSを読み込んでいますがCSSを使うなら自分で作ったCSSのパスを指定してください。
必要ないなら削除で大丈夫です。
注目すべきはformのname属性です。
ユーザーIDに”user_id”、パスワードに”pasword”を指定しています。
こちらはSpringSecurity設定時に必要な項目なので覚えておきましょう。
<!DOCTYPE html>
<html xmlns:th="http://www.thymeleaf.org">
<head>
	<meta charset="UTF-8">
	<link th:href="@{/webjars/bootstrap/3.3.7-1/css/bootstrap.min.css}" rel="stylesheet" />
	<link th:href="@{/css/common/common.css}" rel="stylesheet" />
	<script th:src="@{/webjars/jquery/1.11.1/jquery.min.js}"></script>
	<script th:src="@{/webjars/bootstrap/3.3.7-1/js/bootstrap.min.js}"></script>
    <title>ログインページ</title>
</head>
<body class="text-center">
	<h1>ログインページ</h1>
    <form th:action="@{/login}" method="post">
    <p th:if="${session[SPRING_SECURITY_LAST_EXCEPTION]}!=NULL"
    	th:text="${session[SPRING_SECURITY_LAST_EXCEPTION].message}"
    		class="text-danger">
    		ログインエラーメッセージ
    		</p>
        <div>
            <label>ユーザーID</label>
            <input type="text" id="user_id" name="user_id"/>
        </div>
        <div>
            <label for="password">パスワード</label>
            <input type="password" id="password" name="password"/>
        </div>
        <div>
            <button class="btn btn-primary" type="submit">ログイン</button>
        </div>
    </form>
    <br />
    <a th:href="@{'signup'}">ユーザー新規登録はこちら</a>
</body>
</html>
ログアウトボタンの設置
好きな画面にログアウトボタンを設置しましょう
SpringBootではログアウト処理は”/logout”にPostで通信をすればログアウトできるみたいです。
例としてこんな感じです。
これを好きな画面の好きなところに設置してください。
<form th:action="@{/logout}" method="post">
			<input type="submit" name="logout" value="ログアウト"/>
</form>
コントローラーの設定
適当にlogin画面用のコントローラーを作成します。
今回は本当に必要最低限、Getメソッドを処理するだけにしました。
package com.example.demo.controller;

import org.springframework.stereotype.Controller;
import org.springframework.web.bind.annotation.GetMapping;

@Controller
public class LoginController {

	@GetMapping("/login")
	public String login() {
		return "login";
	}
}
SecurityFilterChainの設定
22行目でログインページのURLを指定します(ログイン用のコントローラで処理するURLです)
23行目でログイン成功時に遷移するURLを指定します
24行目でログイン画面のフォームで使用するユーザー名のname属性を指定します。
25行目でログイン画面のフォームで使用するパスワードのname属性を指定します。
28行目でログアウトが成功した際の遷移先を指定します。
ついでに31行目でCSSはログインしていなくてもアクセスできるように設定を追加しました。
こちらは自分のプロジェクトの階層に合わせて設定してください。
package com.example.demo.config;

import org.springframework.boot.autoconfigure.security.servlet.PathRequest;
import org.springframework.context.annotation.Bean;
import org.springframework.context.annotation.Configuration;
import org.springframework.security.config.annotation.method.configuration.EnableMethodSecurity;
import org.springframework.security.config.annotation.web.builders.HttpSecurity;
import org.springframework.security.config.annotation.web.configuration.EnableWebSecurity;
import org.springframework.security.crypto.bcrypt.BCryptPasswordEncoder;
import org.springframework.security.crypto.password.PasswordEncoder;
import org.springframework.security.web.SecurityFilterChain;

@Configuration
@EnableWebSecurity
@EnableMethodSecurity
public class SecurityConfig {

	@Bean
	protected SecurityFilterChain filterChain(HttpSecurity http) throws Exception {
		http
			.formLogin(login -> login
					.loginPage("/login").permitAll()
					.defaultSuccessUrl("/userList/init")
					.usernameParameter("user_id")
					.passwordParameter("password")
					)
			.logout(logout -> logout
					.logoutSuccessUrl("/login?logout").permitAll()
					)
			.authorizeHttpRequests(authz -> authz
					.antMatchers("/css/**").permitAll()
					.requestMatchers(PathRequest.toStaticResources().atCommonLocations())
					.permitAll()
					.anyRequest().authenticated()
			);
		return http.build();
	}

	@Bean
	public PasswordEncoder passwordEncoder() {
		return new BCryptPasswordEncoder();
	}

}
実際に試してみる
実際に動かしてみましょう。
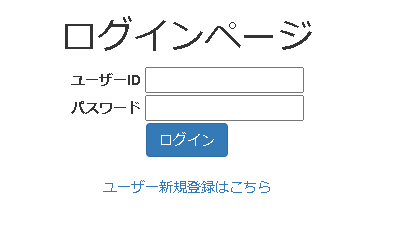
ログイン画面にアクセス
認証成功でログイン成功時に指定したURLに遷移しました。
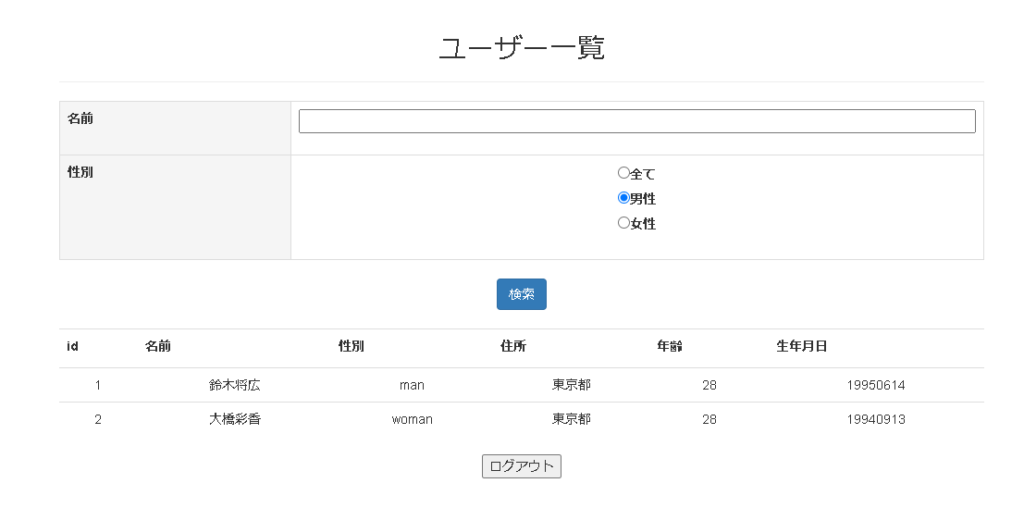
ログアウト時も指定したURLへ遷移していることを確認。
お疲れ様でした。

コメント